Table of Contents
Thermal protection using interior insulation
Because interior insulation is better than you think!
Preface: exterior insulation or interior insulation?
Improved thermal protection is a crucial prerequisite for a comfortable living environment, hygienic indoor space conditions and energy efficient operation of modern heating systems. In the Central European climate heat losses through exterior walls are actually the predominant losses in existing buildings (usually over 50%) - and they can be reduced by several times (by a factor of 3 if done properly) also by means of interior insulation. In Passipedia we have described why we prefer exterior insulation whenever possible. However, we also realise that this is not always possible. In such cases, precedence should be given to insulation on the inside over inadequate insulation or no insulation at all - provided that the interior insulation measure is properly planned and implemented. The indoor climate will then be better with the interior insulation compared to no insulation - and this is true for each of the systems we have described here. The moisture balance of the exterior wall plays a significant role in this, this has been extensively investigated and resolved, see our publications on the topic of moisture protection. Here, we will focus on how such solutions can be implemented in practice. The instructions provided here are naturally not a substitute for individual advice.
Interior insulation – done properly
Interior insulation will only improve structural protection if it is carefully planned and executed. Numerous successful examples already implemented decades ago demonstrate that this works really well.
 |
| Thermographic image of an existing building in Tübingen (German only) in which interior insulation was installed (on the ground floor) in 1986. Thermal comfort is good, the savings are good, and as a subsequent investigation showed, structural protection is also good! |
Caution - clarification in advance is necessary, otherwise there is a risk of damage!
The following prerequisites must be checked first:
- Is the façade to be insulated allocated to the driving rain stress class III? If so, then “nothing” will work without a water resistant façade or some other kind of protection against driving rain.
- Leaks (e.g. near rain gutters or water pipes) which saturate the building assembly must be repaired.
- Wet building materials (e.g. repairing plaster) must be allowed to dry out before the interior insulation is installed.
- Are water-carrying pipes (heating pipes, hot water pipes and also cold water pipes) “built into” (plastered over in) the exterior wall 3) 4) which is to be insulated on the inside here? If so: interior insulation should NOT be applied in these areas (strip plus or minus 1 m) if these pipes cannot be shut down and drained 5).
All the problematic areas mentioned here basically have nothing to do with interior insulation - these are all problems which should be remedied in any case if homeowners are interested in long-term preservation of the building substance of their home. Considerations relating to interior insulation may then perhaps lead to such defects being rectified - this will avoid structural damage and improve comfort in addition, and in the case of otherwise damp walls, this will also already save some energy on its own.
Interior insulation: airtight and thermal bridge minimised
It is always essential to achieve the following:
- airtight assembly of the interior insulation construction against entry of convectively transported moisture from the indoor air and
- Minimisation of thermal bridges at all connection points of the interior insulation.
Why is airtightness important? With air flow behind the interior insulation, in winter huge amounts of moisture can accumulate in the wall assembly with normal indoor air coming from the old interior surface; we have explained this more exactly here: There should NEVER be any air flow behind interior insulation 6). The values7) for airtightness of the cladding of the interior insulation on the room side which are otherwise used in new builds should therefore be complied with. This is a strict requirement, but in practical construction terms it can also be fulfilled in existing buildings, as proved by documented examples [AkkP 32]. We will describe here in detail how this can be achieved in practice, especially also at critical connection points.
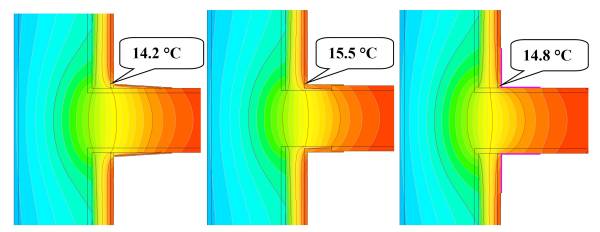
Unfortunately, interior insulation has the potential to intensify thermal bridges of the “destructive kind”, namely those with greatly reduced interior surface temperatures. Incidentally, this was the reason for moisture-related problems in some cases, which led to the perception that “interior insulation is dangerous”. But this can be safely avoided - that exactly is why the planning criterion for interior insulation says that the insulation structure must be designed in such a way that decreases in temperature at all connection points (also with furniture) remain limited to a minimum of 12.5 °C (at outside temperatures of -5 °C, inside 20 °C) e.g.
- Window reveals: with interior insulation, flanking insulation ≥ 20 mm up to the window frame is essential (this can also be implemented as tapered insulation if enough space is not available).
- Ceilings (concrete ceilings): on the upper side, connection to the normal (≥ 25 mm) sound impact insulation is sufficient. An insulation wedge is required on the underside of the ceiling.
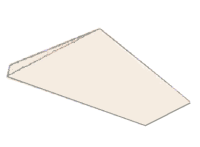
- Intersecting interior walls: interior insulation ending at interior walls usually leads to low temperatures here; damage cannot be ruled out if a piece of furniture is placed here in addition. There are several practicable alternatives: flanking insulation along the interior wall (ca. 40 cm), insulation wedges, insulating decorative strips and heat conducting plates (if a solution is required that is not too apparent (see Fig. 1).
 |
||
| Insulation wedge | Flanking insulation | Heat conducting plate |
| Fig. 1 solutions for reducing thermal bridges at the interior wall connection as an example. (Source: [AkkP 32]) | ||
The exact details 10) depend on the situation found at the structure and on the system selected. For this reason, the details are described in the respective individual instructions which are tailored to the respective method, e.g. here:
Loose-fill interior insulation using capillary-active insulation material
Interior insulation with vapour retarder
By the way, with regard to flanking insulation at the edges, it is NOT absolutely necessary to rigidly adhere to the “system” all the time: e.g. for a solution with a vapour retarder, it is certainly possible for the flanking insulation for an interior wall (e.g. insulation wedge) to consist of a capillary active material (or vice versa). It is easy to understand why this is the case, anyone interested in the subject can read about this here 11). In conclusion, this takes a lot of stress out of implementation in practice, because very inexpensive insulation wedges made of different materials are available from various manufacturers. One of them will certainly be appropriate 12).
More details including many critical connection areas are described and calculated in the Protocol Volume on “Interior insulation” [AkkP 32]. Many manufacturers already offer specially shaped pieces (e.g. insulation wedges) for these applications, made of all types of materials.
An example of an interior insulation measure carried out on a DIY basis can be found here: 36 years of successful interior insulation (German only)
Solutions for protection against moisture
The high amount of water vapour partial pressure which exists in the indoor air in winter can also cause moisture transport towards the (now cold) old wall structure behind interior insulation due also to water vapour diffusion 13). There are two different concepts possible for avoiding moisture-related damage:
Solution I is the “classic concept”: water vapour diffusion from the inside towards the outside is stopped (vapour barrier) or at least impeded (vapour retarder) strongly enough to protect the cold construction from moisture exposure. This solution has proved successful for decades with thousands of implemented measures, sometimes even in very demanding conditions (e.g. in indoor swimming pools). Simulations have shown that with the normal utilisation of living spaces, a minimum value of more than 15 m should be complied with for the effective water vapour diffusion-equivalent thickness of sd,eff [AkkP 32]. With appropriate sheeting, this diffusion-equivalent thickness is stated in the product data sheet. How this is done in practice is described here: Interior insulation: classic method using a vapour retarder.
For Solution II, namely the “use of capillary-active insulation materials”, field applications have also been carried out successfully for some years with good results [AkkP 32]. Water vapour can diffuse through a diffusion-permeable (but airtight) build-up with a capillary-active insulation material. However, a capillary-active insulation material only absorbs some of the moisture and stores this in the pores. This sorbate is transported further into the material due to liquid water transport. According to the incline in the relative humidity, sorbate moisture transport in winter takes place in the inwards direction. However, it is precisely experts who, for whatever reasons, warn against using “capillary-active insulation materials” as a universal remedy for the moisture load in exterior walls of existing buildings without remedying the cause of this moisture load, because return transport of the moisture (through surface diffusion) is limited. Details about this type of implementation can be found here: Loose-fill interior insulation with capillary-active insulation material.
Compromising on the interior insulation thickness is inevitable: the recommended insulation thickness in case of interior insulation is between 40 and 120 mm (thermal conductivity class 035 to 040 (= 0.035 to 0.040W/(m²K))); normally about 8 cm is a good amount.
Implemented examples show that in the range of ΔUWB the “thermal bridge addition” is between 0.08 and 0.15 W/(m²K) with otherwise good planning (without window connections, which must be dealt with separately). Indeed, this is a decisive explanation for why only a small energy savings potential can be tapped with interior insulation compared with exterior insulation [AkkP 32]; the usually very small insulation thicknesses is another reason.
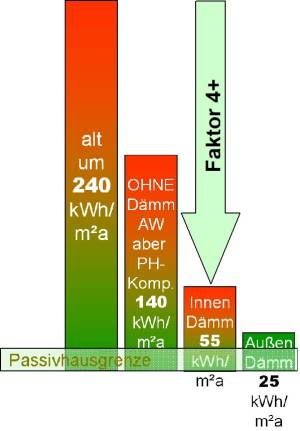
The energy savings potentials for typical existing buildings have been compiled in this illustration: if exterior wall insulation were excluded and the other building assemblies were only renewed using Passive House components, then the heating energy demand will not even be halved. With a high quality of interior insulation combined with Passive House components for the other building assemblies, a specific value of around 55 kWh/(m²a) can be achieved. That's a somewhat higher reduction in consumption than by a “factor of 4”. If exterior insulation is possible, then reduction potentials by a factor of 10 will result. It is apparent that interior insulation is always better than no insulation, but exterior insulation should be used if possible - and this is true not only for saving energy but also for almost all other criteria.
What's the advantage - also in economic terms?
Whether such measures also “pay off” is a key question for many people; it has almost become “self-evident” that this is “expensive and not worthwhile”.
Now there is no general answer to this because there are always some extreme cases in which this is especially worthwhile (uninsulated concrete heater niches, for example) or in which it is actually not worthwhile at all (e.g. if there is an exterior wall of a Passive House building which already has 25 cm of high quality insulation).
However, wanting to know whether a measure would be worthwhile is a legitimate concern in each case. Thus we need a way to check the economic efficiency under the specific conditions existing in individual cases.
And it is precisely for this reason that we have created an easy-to-use online interior insulation calculator. Anyone considering undertaking such measures can at least estimate their economic efficiency here.
It was interesting to find out that retrofitted interior insulation pays for itself through the saved energy costs and even saves money on top of that. There are usually even some returns on the invested capital here - where else is that possible for “normal” consumers? Most financial institutes have not paid any interest on deposits for a long time.
This economic consideration is only half the truth, of course, because due to interior insulation, thermal comfort inside is also improved, and security for the occupants is also significantly increased in the event of a serious energy crisis: somewhat bearable conditions can then still be maintained in a room even with little energy. Those are not the only advantages. In fact, if changing to a sustainable heating system with a heat pump for example becomes necessary at some point, then with improved insulation this will often almost always make sense in the first place and will be possible with considerably less effort 14). If the user already has a heat pump for heating then retrofitted insulation will help to reduce the forward flow temperature, the heat pump will then run more efficiently.
See also
Interior insulation with a vapour retarder
Back to overview of Structural measures for saving energy
Exterior insulation measures for exterior walls
Plaster base formwork for subsequent loose-fill insulation
General information on thermal protection of buildings
Reference literature
[AkkP 24]. Refurbishment with Passive House components, Protocol Volume No. 24 of the Research Group for Cost-effective Passive Houses, Phase III; Passive House Institute; Darmstadt, 2003
[AkkP 32] Passive House components + interior insulation, Protocol Volume No. 32, Passive House Institute, Darmstadt. Important results supplemented with new material can be found in PASSIPEDIA with this link: Interior insulation solutions.


