Table of Contents
Overall retrofit plan for step-by-step retrofits to EnerPHit Standard
Jan Steiger and Eva Vahalova, Passive House Institute Rheinstrasse 44/46, 64283 Darmstadt, Germany Phone: +49 (0) 6151 826990, jan.steiger@passiv.de, eva.vahalova@passiv.de
1 Introduction
In the EuroPHit project, funded by the European Commission in the Intelligent Energy –Europe (IEE) programme, deep renovations carried out step by step have been the focus of a consortium of 14 partners all across Europe. The share of step-by-step retrofit processes in the building retrofit sector is significant: According to a study carried out by the German Federal Institute for Research on Building, Urban Affairs and Spatial Development (BBSR) in Germany in 2014, 85 % of the costs for retrofits of residential buildings have been invested into single measures or packages of retrofit measures. The EuroPHit consortium thereby has developed recommendations, products, tools and quality assurance processes to improve step-by-step retrofit processes and facilitate deep energy retrofitting even for single measures.
2 Practical implementation across Europe
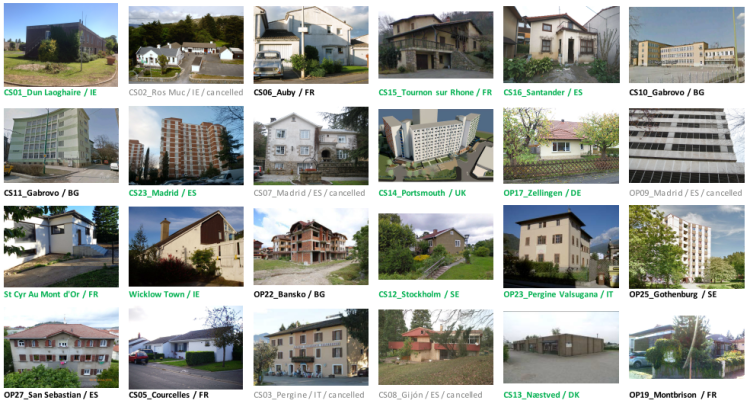
Out of 20 pilot projects started within EuroPHit, 11 case study projects with at least one retrofit step have been completed by April 2016, 9 more projects are currently ongoing and will have completed retrofit measures after the project completion. Building types and retrofit measures range from single-family homes to residential social high-rise buildings, where the EnerPHit Standard was implemented completely except for a more efficient heating system, which could not be installed for now. In other multi-family buildings, only one dwelling was improved to achieve a high efficiency and comfort level, whereas in non-residential buildings, retrofit measures consisted of the renewal and efficiency improvement of the flat roofs of only a section of the whole school building. In EuroPHit, a total budget of 26 million Euros has been foreseen to start or complete retrofit processes of more than 40.000 m² of floor area to EnerPHit Standard.
3 Types of step-by-step retrofit processes
In general, we can differentiate between two types of step-by-step retrofit processes:
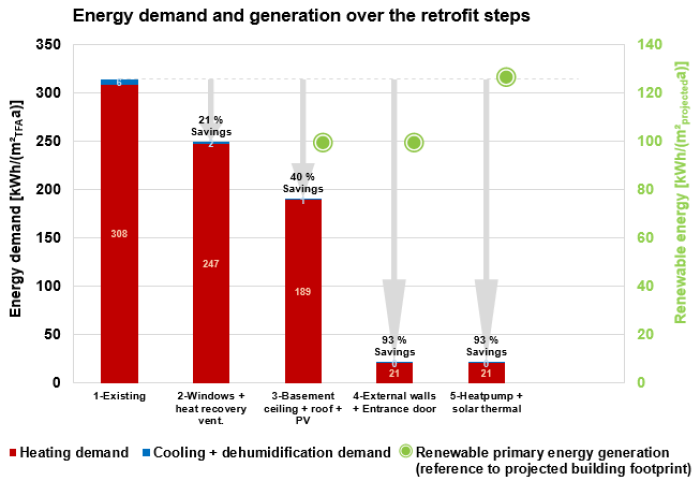
Sequential retrofitting of building components: For example, Step 1 consist of the wall insulation; in Step 2, the windows will be replaced and a ventilation system is installed; and in Step 3, the roof insulation, the heating system and other measures are implemented to finally reach EnerPHit Standard (Figure 2).
Sequential retrofitting of building parts or sections, for example, a refurbishment of single building wings, apartments, new extensions or terraced houses. Even the retrofit of single sides of a building only can be envisaged (Figure 3).
4 Requirements for the pre-certification process
If energy retrofits are carried out in several individual consecutive steps, then pre-certification of the building as a Passive House or EnerPHit project is possible. Unlike for certifications of completed buildings, the preparation of a comprehensive EnerPHit Retrofit Plan (ERP) is a prerequisite for this in order to verify the possibility to achieve EnerPHit Standard at the final completion. The pre-certificate provides building owners and planners with the security that the standard being aimed for will actually be achieved after completing all steps. The pre-certification can take place as soon as the following prerequisites have been met:
• The ERP and all other necessary documents in accordance with building certification criteria have been submitted.
• The first retrofit step has been completed and meets the specifications in the ERP.
• The primary energy demand has been reduced significantly compared with the initial state.
• Exception: For buildings with several owners it is alternatively sufficient if one property unit has been almost entirely modernised. If there are new extensions, the pre-certificate may already be issued when the ERP has been implemented in the extension only for the time being.
• A leakage detection has been carried out. A full blower-door test must only be carried out once in the retrofit process, when it make sense to check the airtightness of the retrofitted building, usually after the modernisation of the whole building envelope.
5 The EnerPHit Retrofit Plan (ERP)
The EnerPHit Retrofit Plan (ERP) is a document for building owners. It includes a well-thought-out overall concept for stepwise retrofits. This takes into account important interrelations between different energy saving measures. Thus an optimal final result can securely be obtained over all steps with manageable effort. The ERP output file is a separate file to PHPP and creates the basic structure of the retrofit plan by import from a completed PHPP. Besides information on qualities of components before and after the modernisation, or recommendations for component connections, the ERP contains several worksheets which can be used to explain the efficiency improvements to the building owner:
• TITLE – general information, chart illustrating the decreasing energy demand (Figure 4).
• SCHEDULER – allows to enter lifecycles and illustrates the point of time to carry out retrofit steps to roughly schedule all the required steps to achieve EnerPHit Standard.
• OVERVIEW – allows a clear detection if the steps carried out allow the fulfilment of EnerPHit criteria for both component qualities or energy demand and shows the annual sum of investment costs and energy costs for all steps.
• COSTS – you can enter the estimated investment costs for the measures here, including the costs for anyhow-measures and financial support.
Efficiency parameters and corresponding results are automatically transferred from PHPP into the ERP. All that needs to be done is the entry of information regarding schedule, costs and recommendation for each of the retrofit steps. By doing so it is possible to provide a comprehensive document to building owners so that they can better understand the specific concepts and the potential of the retrofit process they have started.
6 Entry of retrofit steps into PHPP
The ‘VARIANT’ worksheet in PHPP (Figure 5) is used to enter data for each retrofit step.
Efficiency parameters and corresponding results are automatically transferred from PHPP into the ERP. All that needs to be done is the entry of information regarding schedule, costs and recommendation for each of the retrofit steps. By doing so it is possible to provide a comprehensive document to building owners so that they can better understand the specific concepts and the potential of the retrofit process they have started.
6.1 Sequential retrofitting of components
Entering improvement of building components is fairly easy: • You can start with a variant for the existing building, with no or probably poor insulation, poor windows, ventilation by windows and old heating systems or distribution concepts.
• PHPP 9 offers a wide range of parameters which have been predefined to be calculated as parameters automatically. Enter the parameters of the improved components, for example, for insulation layers or improved quality of windows. Other parameters, like shading, ventilation concepts, heating or cooling systems, can also be adapted using pre-defined entries.
• Other parameters can be entered in the user-defined section. In order to do so, the user manually links the PHPP entry cell that is supposed to be modified to the “active” column in the worksheet ‘VARIANTS’.
6.2 Sequential retrofitting of building parts / sections
Entering retrofitted building parts, single dwellings only or extensions into PHPP will be trickier:
• If the retrofit is carried out one building side after the other or not all elements of one component are improved in one step, this can be done by creating sub-variants (indicated with letters ‘a’ to ‘z’ in the worksheet ‘VARIANTS’) of exactly the same type and allocating these to the windows that will be modernised in the corresponding step (in this case, the south-facing windows are retrofitted first, all other windows on the north or west side will be replaced later) (Figure 6).
• There might also be retrofits of sections of a building, even single dwellings only. Work with the same approach and make sure that the components/building elements to be split into several retrofit steps are entered separately. Thereby, you will be able to assign component qualities to these elements which will be improved in different retrofit steps.
• For special cases like extensions of buildings, adding or demolitions of components (e.g. the insertion of a window into a wall during a retrofit step), work with the user-defined variant section and use the quantity of the components to indicate if a component is there or not. Enter “0” or “1” for “not existing” or “existing”, respectively, of the component and link the “active” column to the entry cells for the quantity of the components in the worksheet ‘AREAS’ or ‘WINDOWS’.
7 Implementation of renewable energy sources
You can, of course, also indicate if renewable energy sources are to be installed during one of the retrofit steps. To do so, enter the specifications of the photovoltaic (PV) system into the worksheet ‘PV’. The only thing left to do then is linking the entry cell for the quantity of modules to the “active” column in the worksheet ‘VARIANTS’. There you can enter the quantity for the retrofit step foreseen, in the preliminary steps you only enter “0” to indicate no PV modules have yet been installed. Solar thermal systems can entered in the same way.
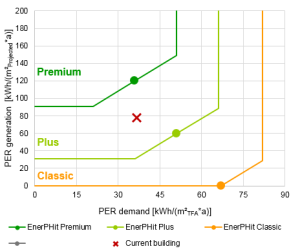
For the 20 step-by-step retrofit projects in EuroPHit, only two projects have yet foreseen the implementation of renewable energy sources in the near future. However, a total PV implementation potential of almost 760 MWh/a has been calculated, which translates into almost 20 kWh/(m²TFA a). Future implementation of RES thereby would enable several of the pilot projects addressed in EuroPHit to be upgraded to the standards EnerPHit Plus or Premium after completion of the retrofit steps (Figure 7).
The pre-certification process of step-by-step retrofits will be available as of April 2016 in English and German, when PHPP 9.6 is released at the Passive House Conference.
8 References
EuroPHit – Retrofitting for the energy revolution, one step at a time: http://europhit.eu/certification-retrofit-plans
PHPP 9.6 (2016) – The energy balance and design tool, Passive House Institute: http://passivehouse.com/04_phpp/04_phpp.htm
Criteria for the Passive House, EnerPHit and PHI Low Energy Building Standard, Passive House Institute: http://passivehouse.com/downloads/03_building_criteria_en.pdf
Bericht zur Lage und Perspektive der Bauwirtschaft, Bundesinstitut für Bau-, Stadt- und Raumforschung (BBSR): http://www.bbsr.bund.de/BBSR/DE/Home/bbsr_node.html
| The sole responsibility for the content of Passipedia lies with the authors. While certain marked articles have been created with the support of the EU, they do not necessarily reflect the opinion of the European Union; Neither the EACI nor the European Commission are responsible for any use that may be made of the information contained therein. |


