This is an old revision of the document!
Table of Contents
Windows in a step-by-step retrofit
Authors: Eva Vahalova and Benjamin Krick (Passive House Institute)
1. Introduction
In practice, windows and façades are seldom retrofitted at the same time, even though doing so would save costs, reduce thermal bridges and optimise solar gains. There are many reasons why retrofits are done step by step. Often, new windows are put in between tenants, or a window may be in such bad shape that it cannot wait. If a façade is renovated, any windows renewed “in the meantime” will still be in good shape and not need retrofitting. In addition, building users may not wish to be bothered further. Often, there simply is not enough capital to do both things at once. Sometimes, the ownership community can only reach a minimal consensus.
Ideally, windows and façades should always be retrofitted simultaneously whenever possible. Where it is not possible, the following tips from the EuroPHit project are helpful.
2. First windows, then insulation
2.1 Starting point
Generally, new windows are installed in the position of the old ones. This approach lowers investment costs because windowsills and any shading fixtures used do not need to be changed; the process goes quickly, and users are not bothered much. There are, however, high follow-up costs. In the end, once the wall is insulated, it will have thermal bridges from installation, and solar gains are lower because of reveal shading. Additional insulation of the window reveals raises costs further; the application of exterior wall insulation and lower exterior aperture sizes due to reveal insulation can easily lead to an ‘embrasure’ effect, especially when windows are small.
2.2 Proposed solution
For the EuroPHit project’s 2015 Component Award “Windows in step-by-step retrofits”, the focus was on solutions that are as affordable and functional as possible over the window’s lifecycle with consideration of investment and energy costs for the entire service life.
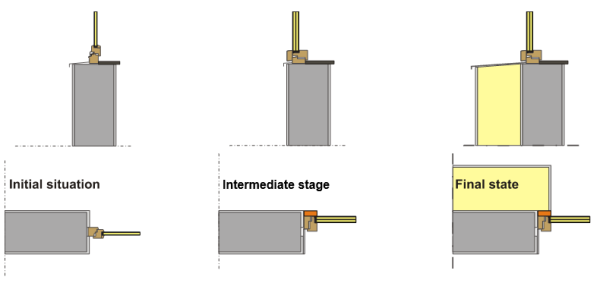
The result is surprisingly simple: The window, preferably with an integral frame (where the frame covers the casement), is installed flush with the exterior masonry, and the resulting gap is carefully sealed with a permanently elastic sealing agent (Figure 1). Well insulated Passive House frames are required for this situation; if standard frames are used, the temperatures at the interior window connection can be critical. Later, when the façade is renovated, the window frame can easily have insulation added to it. All other solutions turned out to be detrimental: If the frame is installed deeper in the reveal, the installation thermal bridge in the final state is much greater. Insulation of the reveal adds costs and increases reveal shading. A position within the future insulation level may be good in terms of installation thermal bridges and reveal shading, but installation in front of the wall leads to additional costs, and sealing off the resulting bays turns out to be difficult. In addition, the jury for the 2015 Component Award found this “bay solution” to be unacceptable in terms of design.
2.3 Shading/blinds
Roller shutter boxes are one of the major weak points in a building envelope. Generally, roller shutter boxes are not airtight, and it is hard to make them so in existing buildings. The result is high heat losses, even when the roller shutter box is insulated. Because the roller shutter box contains more or less cold outdoor air, insulation does not have any advantages.
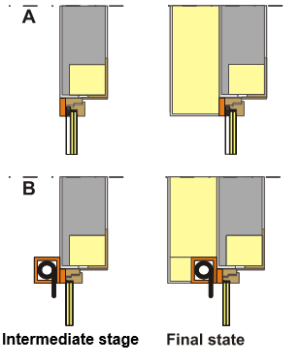
It is therefore recommended that the old roller shutter be removed along with the window; the roller shutter box should then be insulated and made airtight from the outside, and a new darkening/shading option should be provided (Figure 2). A front-mounted box or blinds that can be integrated in the new insulation later are a good option. In these cases, the frame and the front-mounted box should be thermally separated to reduce installation thermal bridges.
An even better option shown at the 2015 Component Award is shading in an air gap between an exterior single window pane and interior heat insulating glazing. The award showed that the investment costs for such shading are less than half those of blinds. Additional benefits include weather protection for shading/ darkening, lower thermal bridges and simpler, faster installation. The drawback is that the slats or the screen can slightly enlarge the visible frame width at the top, and dirt may collect on the panes in the air gap, which would then require cleaning. If this additional cleaning is to be avoided, filters can be used. This solution, called “composite windows”, is generally only offered for side-hung windows. However, some manufacturers are working on solutions for stationary glazing as well.
3. First insulation, then windows
3.1 Starting point
If the façade is retrofitted, insulation is added to the reveals up to the window frame at its best. Often, however, the reveals are not insulated, especially when roller blinds are used. The result is a massive thermal bridge. If the window is to be renewed in a second step, it is installed where the old window was so that the new plaster and insulation are not damaged. The situation is hardly improved; the installation thermal bridge remains large, as does reveal shading.
3.2 Proposed solution
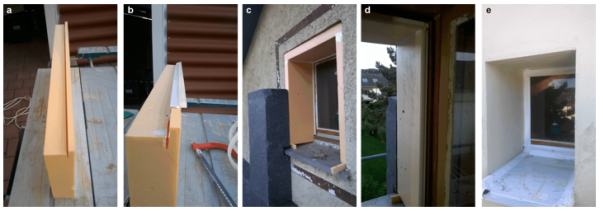
Provisions should be made so that the new windows can be installed in the new insulation layer. Front-wall mounting systems can be used for this purpose, such as those from Iso Chemie, Hanno and Illbruck. Another option is self-made hidden parts of the frame made of timber or hard insulation materials (such as CompacFoam, Purenit and similar products/ materials). The Passive House Institute is currently working on a certification scheme for such products.
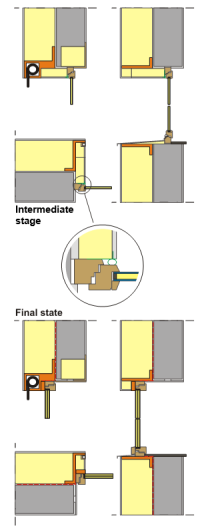
The front-wall mounting system is attached to the exterior wall and connected to the insulation (Figure 3). Then, insulation is applied to the reveal up to the old window. At the position of the new window, a plaster strip is used, and the reveal insulation is redone. When the window is replaced, the interior part of the insulation over the reveal can be taken off up to the plaster slat and the new window placed in the planned position without requiring any other work on the thermal insulation composite system.
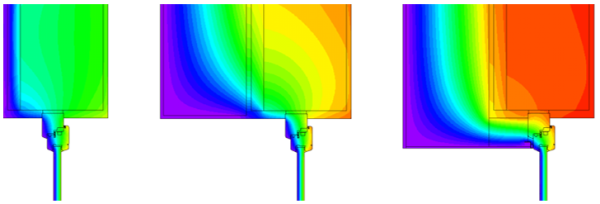
Covering the casement with insulation is an especially good way of reducing the installation thermal bridge (Figure 4). The reveal insulation can be used to close gaps; at the end where it meets the casement, a hose seal can be used to connect it to the casement. This approach considerably improves the thermal situation (Figure 5); in addition, the old window frame is now optimally protected from the weather, which can increase its service life considerably. This approach is only easy to implement on the side and top connections, however, because rainwater has to drain off the balustrades.
3.3 Shading/blinds
Here again, the recommendation is to change darkening/shading in the first step for reasons similar to those given in Section 2.3. The roller shutter box can be installed directly on the front-wall mounting system. It is a good idea to have the slats roll to the outside; the guide rails are then farther out and do not have any significant thermal bridge effect. As much insulation as possible should be used between the roller shutter box and the window to reduce the thermal bridge. Alternatively, the composite window solution presented in Section 2.3 can also be used here.
3.4 Replacing glazing
If the window is in good condition and insulation over the casement is to be used as recommended in Section 3.2 in order to extend the window’s service life, the glazing can be replaced with triple glazing. This option is particularly possible with timbered windows. To reduce weight and avoid unnecessarily putting an additional load on the frame, partly pre-tensioned thin-layered panes should be used. A 3/x/2/x/3 (3 mm of glass outside, 2 mm inside) pane design is recommended. The new glass will then be exactly as heavy as the old. The old glass generally has two panes with a thickness of about 4 mm each; along with 16 mm of space between the two panes, the total is 24 mm. In terms of thermal quality, the optimum for glazing filled with krypton is 8 mm of glass + 2 x 12 mm of space between the panes for a total of 32 mm. Generally, this should be possible if the old window’s pane-holding strip is reduced. Krypton, however, is much more expensive than argon, and also the losses at the glass edges are much lower if the gaps between the window panes are larger. The optimum for argon-filled glazing is 8 mm of glass and 2 gaps of 18 mm between the panes for a total of 44 mm. For such glazing for a standard IV 68 window, the pane-holding strip should be reworked as shown in Figure 6. The airtight connection between the old frame and the new glass should be made by using an adhesive tape that is as diffusion-tight as possible so that condensation does not build up as so often happens with these old windows, thereby preventing the frame from rotting and extending the window’s service life. When the glass is renewed, old sealants can also be replaced if necessary.
4. References
| [Krick 2015] | Krick, B.: Component Award for Passive House Windows: comfortable, profitable, innovative, and future-proof. In: Feist, W. (editor): Proceedings of the 19th International Passive House Conference 2015 in Leipzig, Passive House Institute, Darmstadt, 2015. |


